
Marty_d
-
Posts
5,112 -
Joined
-
Last visited
-
Days Won
74
Content Type
Profiles
Forums
Gallery
Downloads
Blogs
Events
Store
Aircraft
Resources
Tutorials
Articles
Classifieds
Movies
Books
Community Map
Quizzes
Videos Directory
Everything posted by Marty_d
-
GA8 Airvan new build by Gippsland Aero
Marty_d replied to Blueadventures's topic in Other GA Aircraft
There's a DC-3 still flying to Antarctica. Wouldn't be the same though - converted to turboprops. -
ABC article alleging "hobby aircraft" not safe
Marty_d replied to ClintonB's topic in Aircraft Incidents and Accidents
So when any GA aircraft gets hired out for a "hobby' flyer to bore holes in the sky for an hour, it becomes a hobby aircraft? Doesn't matter who owns it, just who's driving it. -
GA8 Airvan new build by Gippsland Aero
Marty_d replied to Blueadventures's topic in Other GA Aircraft
Getting a bit heated guys. This site is about the aircraft. -
Yep, 1113 I think. At 19 degrees that gave me 383.23 on the floor, whereas if you stick 19.1 degrees in the calculator it gives 385.41.
-
Thanks Bob! I like the idea of the stick with clamp to get vertical distance. Especially if the stick is a spirit level so you know it's vertical. Will double check with that next time I do this. With the blade tracking further forward, do you mean if the prop hub was sitting on a flat surface then that tip is 2mm higher than the other 2? According to the instructions that came with mine, the flat table test should come after pitch - so now I have to take the prop off and do that test before putting it back on again.
-
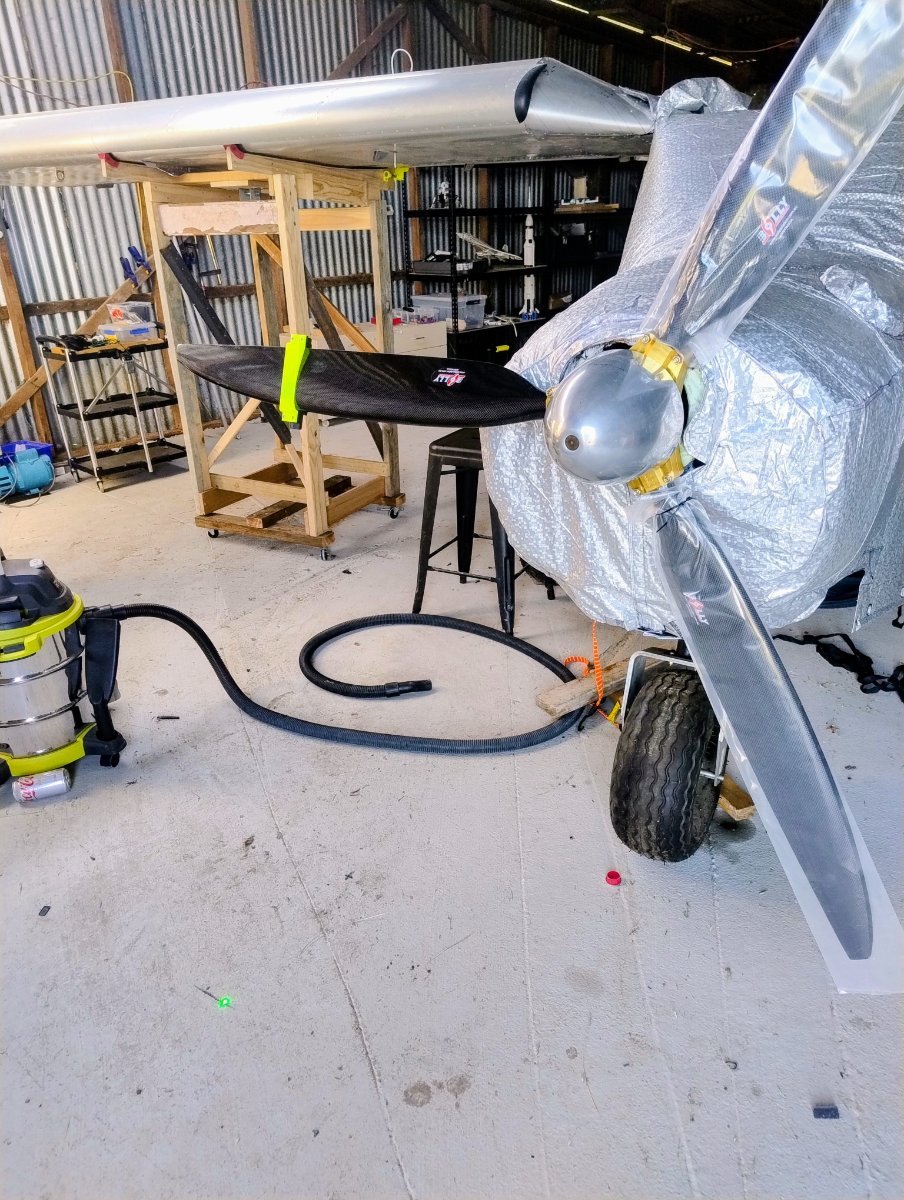
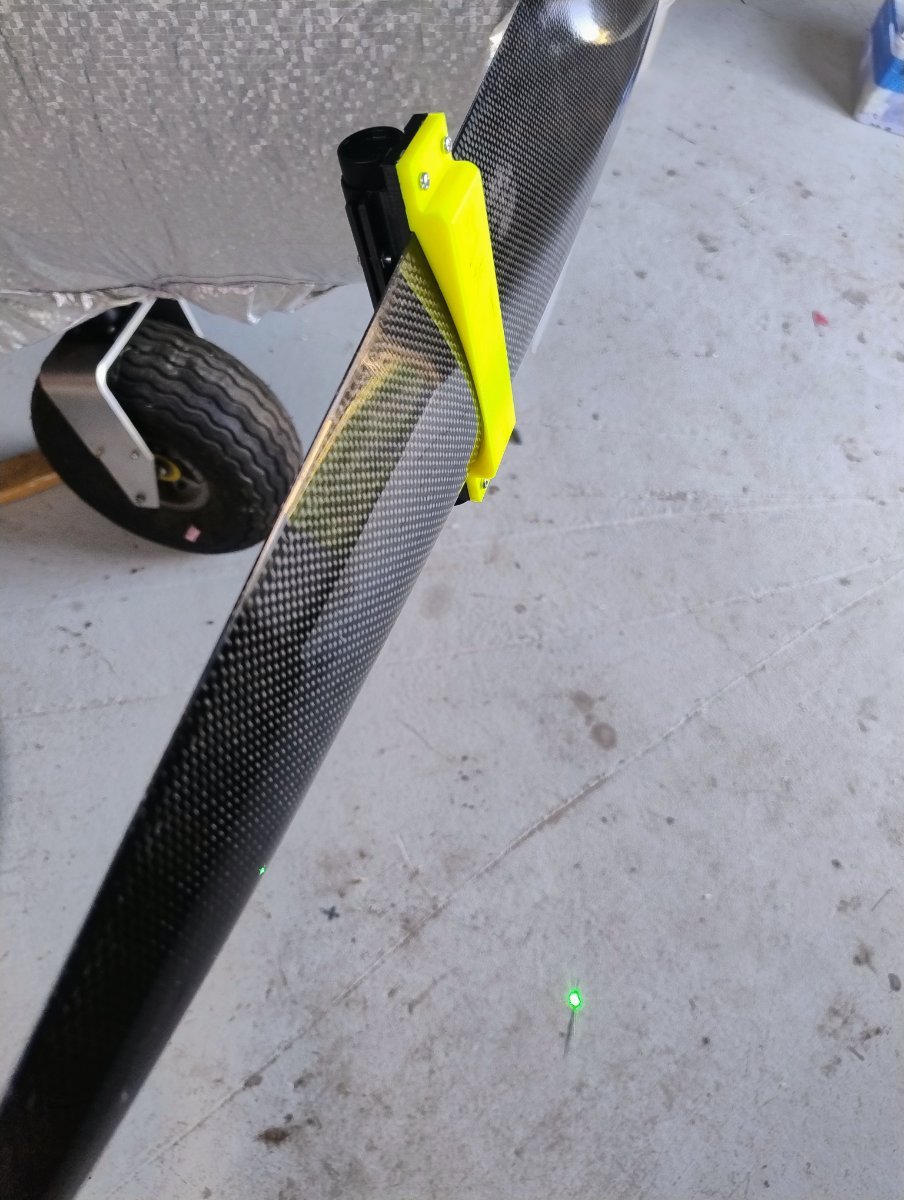
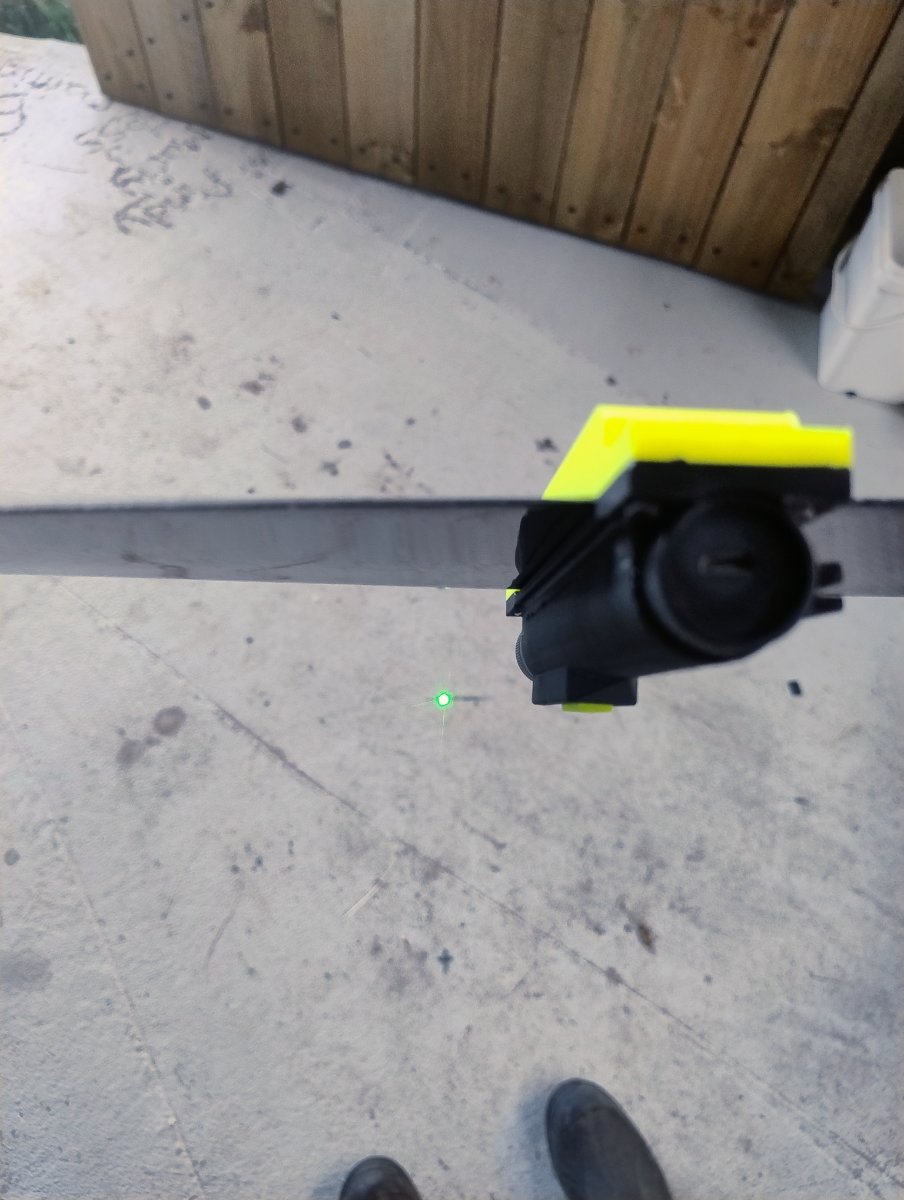
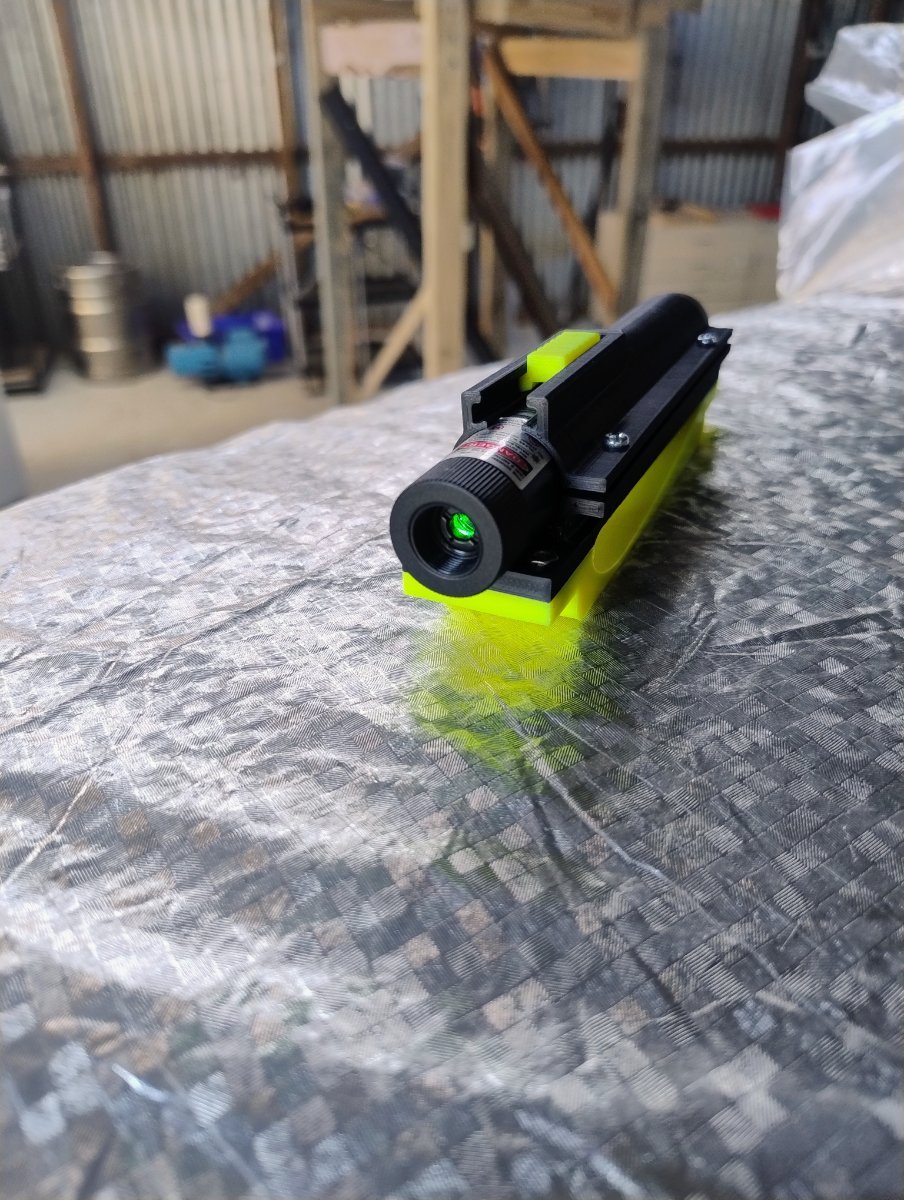
Prop pitch done! (First attempt anyway!) I made a tool to hold a laser pointer which I bought on Ebay for $17. I think it might be slightly illegal as the damn thing is very powerful - you can clearly see the beam in low light conditions and even in broad daylight you can see the spot on a tree that's 100m or more away. Anyway, I was interested in @IBob's method of attaching a piece of wood and aluminium to the prop, but being someone who likes to over-complicate things I 3D printed a holder for the pointer based on measurements of the prop blade at 300mm from the tip (600 from the centre). It slips on and stops at the same spot on each blade, and features a sliding switch which holds down the spring loaded button. If anyone has a Bolly 3 bladed prop of the same model and wants to print their own, I'm quite happy to email you the STL file. I ensured the prop is as vertical as possible, found the height where the blade is parallel to the ground and leveled the flat back of the blade vertically. From this point I turned on the laser and made a cross on the floor where it hit. Then used a calculator to get the adjacent length of the right angle triangle where I knew the vertical length and a 19 degree angle. Marked a line at that point forward of the mark on the floor. (Just to check, I calculated for 18.9 degrees and 19.1 degrees. Each 1/10th of a degree is around 2.2mm.) After that it was just a matter of swiveling the blade until the laser line exactly hit the front line, and repeat for the other 2 blades. I nipped up the bolts just enough to hold the blades from turning - less than 8nm. When I recheck with the spinner thingy off completely I'll tighten up the bolts to the recommended torque settings in the recommended order.

-
ABC article alleging "hobby aircraft" not safe
Marty_d replied to ClintonB's topic in Aircraft Incidents and Accidents
My thoughts exactly, I would have no idea of where to start with designing a helicopter. -
Incident at Moorabbin 08/01/25
Marty_d replied to red750's topic in Aircraft Incidents and Accidents
They might need a sling to get it back to the hangar. -
Are there any of these in Australia? There's some posts from Murray A who's building one in his garage in Canberra, but he hasn't been on here since 2020.
-
I think I'm in love.
-
It was on ABC radio this arvo too. They keep pushing it. I know they sometimes jump on a story and keep thrashing it, not sure why this particular one is retaining traction though.
-
The topic is linear actuator for a cowl flap. Suggesting that there are other ways to actuate a cowl flap is not really off topic.
-
There was an interesting cowl flap shown somewhere here, French bloke had it on top of his cowl to release heat while on the ground. From memory it was hinged forward of the midpoint of the flap and lightly sprung, so at low speeds it would open but any wind pressure would close it.
-
Who's watched PLANE - Gerard Butler? 2023
Marty_d replied to flying dog's topic in AUS/NZ General Discussion
Wasn't a bad watch if you're prepared to gloss over the obvious errors. Gerard is usually pretty good for a bit of entertaining violence. -
Another airliner crash - South Korea 29/12/24
Marty_d replied to red750's topic in Aircraft Incidents and Accidents
More clickbait. Having a "bumper attached to the rear of the plane's fuselage scrape along the runway during takeoff" 4 years ago, would in no way would contribute to the recent disaster. -
Another airliner crash - South Korea 29/12/24
Marty_d replied to red750's topic in Aircraft Incidents and Accidents
Video on the ABC link provided above. Click on "show more posts". Nose seemed to be reasonably high all the way down the runway. Wonder if that contributed to it going so far. -
Another airliner crash - South Korea 29/12/24
Marty_d replied to red750's topic in Aircraft Incidents and Accidents
ABC update says all bar 2 dead. https://www.abc.net.au/news/2024-12-29/live-updates-plane-crashes-south-korean-muan-airport/104769186#live-blog-post-142635 Yes if that brick wall (or other obstacles) wasn't there, it would have been a far better outcome -
Can't be RAA, it's a multi-reindeer craft
-
Found the bugger!
-
Unless I'm mistaken, you're not allowed to have passengers during the 25 hours proving thing anyway, are you? Which removes the possibility of paying for your passenger's therapy for the rest of their life. Therefore wouldn't (in most circumstances) the $10m public liability through your membership be sufficient? Of course there's the hull, but that's up to you. In my case I'll probably take the risk without hull insurance, because as a scratch built aircraft it only owes me about $25k over the 14 long years it's taken to build it (so far).
-
To whoever buys it... let's talk hangarage 😁
-
Thanks Bob. I'll have to check the vent, not sure if mine has one on the header tank or not.
-
Actually don't have a fuel gauge. Tempted to try those sensors that stick on the outside of the tank and have an LED when there's no liquid at that level. Until then, it's a matter of calculation and of course the low fuel indicator when the header tank is the only fuel left (15 minute warning).
-
Help needed! I'm at the point of testing the fuel system. It'd be great to get some advice about how to go about this. These are my thoughts so far: (note - all filling of tank and back to containers through Mr Funnel to remove any contaminants) Test 1: From tanks to splitter Visual inspection of all fuel lines from tanks to carbs. Check of all quick release fittings to ensure engaged and open. Check tanks to ensure no debris/insects/whatever. Prepare aircraft (tyres to correct pressure, sitting level, towels on wing roots just in case of spill). L + R fuel taps off. Put an initial small amount (5 litres?) in each tank and check for any leaks from tanks to fuel taps. Cockpit fuel tap off. Turn L + R taps on and go under plane to check header tank fills correctly. Check for any leaks from header to cockpit tap. Disconnect line that runs from Rotax mechanical pump to the 5-way splitter. Put the end in a new bucket with litre graduation marks. Turn cockpit fuel tap on. Check that fuel drains with no leaks into the bucket and time it to get flow rate. Test 2: To carb ends As above, plus: Increase amount of fuel to say 10L per tank (beware of bucket capacity while draining) Connect line back to the splitter but disconnect the carb ends; drain to 2 buckets Check for any leaks in the system - including in cockpit (line to fuel pressure gauge) Test 3: Electric pump Put 10L in each tank and open all taps. Test the electric fuel pump - measure flow to the buckets. Check that fuel is being delivered evenly to each carb end. Test 4: Fuel pressure gauge Reconnect carbs. Put 10L in each tank and open all taps. Check that the fuel pressure gauge on the panel is registering pressure. Test 5: Full tanks Top tanks to full (without spilling) Check for leaks throughout entire system Check fuel pressure gauge Drain from header drain (lowest point in system) to fully drain. Any thoughts? What am I missing? Is the testing order right? Are there other tests I need to do? Is the full tank test really necessary? (Just thinking - that's 77 litres of petrol, and both our cars are diesel...) All assistance gratefully received. Cheers, Marty
-
They're finished Taylor Monoplanes up there having fun, just waiting for you to join them! Have a good xmas Don.